7720
Gross
Tons
410 feet Length, 56 feet Beam, 37 feet Deep
Owner: Lykes Brothers Steamship Company, New Orleans, LA
Builder: Bethlehem Ship Building Corp., Alameda Yard, San Francisco, CA
Previous Names: Wichita, USS Liberator (ID 3134), Off. No. 216541
Torpedoed
by U-332, Kapitanleutnant Liebe, March 19, 1942
Depth 110 feet
History of the Ship
The SS Liberator was built in San Francisco by the Bethlehem Ship Building Corporation, at their Alameda Yard, which was originally known as Union Brass and Iron Works when they began operation in 1885. Union Brass and Iron Works built not only ships, but Steam Locomotives and Boilers here. They were purchased by Bethlehem Steel Corporation and became the largest shipyard on the West Coast and produced hundreds of vessels until closing in the 1980's. Produced by this yard were a wide range of vessels, to include submarines and warships, tugs and barges, plus scores of merchant vessels such as the Liberator. Built in 1918, the Liberator was the 151st hull from this builder and the name of the ship during the build process and first launching was "Wichita". The "Wichita" was launched on March 24, 1918 and remained at the yard for completion and fitting out which was finished in July.
 The
ship apparently never sailed under the Wichita name as she was acquired by
the U.S. Shipping Board and assigned to the U.S. Navy on July 2,
1918. She was immediately commissioned the USS Liberator (ID 3134)
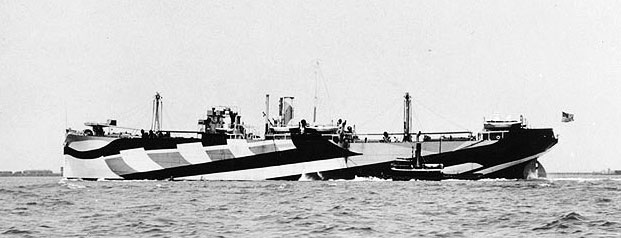
and prepared for military transport service due to World War I. The
ship was given a very interesting paint scheme (World War I type 5, design
B, dazzle camouflage; shown in the photo to the right) and then she set
sail for the Panama Canal. The new Navy vessel headed to New York
where she arrived on August 7, 1918. She was immediately loaded and joined
a convoy on August 13th carrying war supplies and cargo across the
Atlantic. Her first crossing took 15 days and the USS Liberator
discharged her first cargo in Brest, France. This transport work
continued until the fighting stopped in November of 1918 and then USS
Liberator took on another important role. She was returned to the
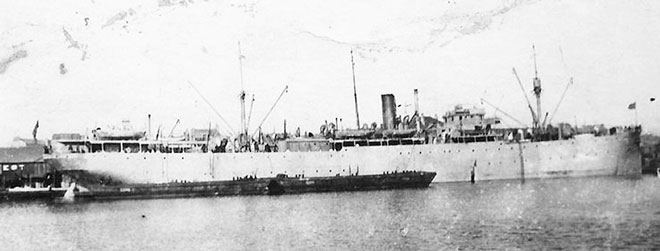
US, then quickly converted into a troop transport ship and USS Liberator made five round
trips from Europe bringing the Doughboys home from France. A photo of her
in St. Nazaire is shown below - notice the troopship layout with the rows
of portholes in her hull. Her work for the war effort was over and
she was now surplus Government property.
The
ship apparently never sailed under the Wichita name as she was acquired by
the U.S. Shipping Board and assigned to the U.S. Navy on July 2,
1918. She was immediately commissioned the USS Liberator (ID 3134)
and prepared for military transport service due to World War I. The
ship was given a very interesting paint scheme (World War I type 5, design
B, dazzle camouflage; shown in the photo to the right) and then she set
sail for the Panama Canal. The new Navy vessel headed to New York
where she arrived on August 7, 1918. She was immediately loaded and joined
a convoy on August 13th carrying war supplies and cargo across the
Atlantic. Her first crossing took 15 days and the USS Liberator
discharged her first cargo in Brest, France. This transport work
continued until the fighting stopped in November of 1918 and then USS
Liberator took on another important role. She was returned to the
US, then quickly converted into a troop transport ship and USS Liberator made five round
trips from Europe bringing the Doughboys home from France. A photo of her
in St. Nazaire is shown below - notice the troopship layout with the rows
of portholes in her hull. Her work for the war effort was over and
she was now surplus Government property.
 The
USS Liberator was decommissioned from the US Navy in October of 1919 in
Hoboken, NJ, and returned to the U.S. Shipping Board. The ship
apparently sat in the Government surplus inventory until 1933 when she was
sold off to the Lykes Brothers Steamship Company of New Orleans, LA.
The Lykes Brothers kept the name of the ship the same, but since she
was no longer a Government vessel, it lost the USS designator and now became
simply SS Liberator. Converted back to a cargo vessel, the SS
Liberator was operated by Lykes Brothers out of Galveston, TX carrying
bulk cargo on coastwise routes. This was the service the ship
was in at the time of her sinking.
The
USS Liberator was decommissioned from the US Navy in October of 1919 in
Hoboken, NJ, and returned to the U.S. Shipping Board. The ship
apparently sat in the Government surplus inventory until 1933 when she was
sold off to the Lykes Brothers Steamship Company of New Orleans, LA.
The Lykes Brothers kept the name of the ship the same, but since she
was no longer a Government vessel, it lost the USS designator and now became
simply SS Liberator. Converted back to a cargo vessel, the SS
Liberator was operated by Lykes Brothers out of Galveston, TX carrying
bulk cargo on coastwise routes. This was the service the ship
was in at the time of her sinking.
Sinking of the SS Liberator
At dawn March 19, 1942, the SS Liberator was approaching the area of Cape Hatteras carrying a load of 11,000 tons of sulfur from Galveston, TX, bound for New York city and the crew and ship's master were very tense. Hours earlier, just to the South in the area just North of Cape Lookout, the ship had a very harrowing experience. Just past 1AM, the ship's crew had spotted what they believed to be a submarine closing on the freighter in the dark. USN Coxswain Frank Camillo, head of the four man Navy gun crew, went into action and used the stern mounted 4" gun to fire upon this target. The gun crew's training and aim was excellent, hitting the Sub with two rounds from the cannon. Liberator's crew members saw the explosions and the sparks fly as the submarine turned away and disappeared allowing the ship to escape into the night.
 Unfortunately, the SS Liberator had fired upon not a submarine but the USS Dickerson,
DD-157, a US
Navy Destroyer. The first round hit the Dickerson on the starboard
side of the Bridge, passing through wing bridge railing, the Chart Room
and exploding in the Radio Shack. The second round was also a
hit. This attack killed three men immediately and wounding seven others to include
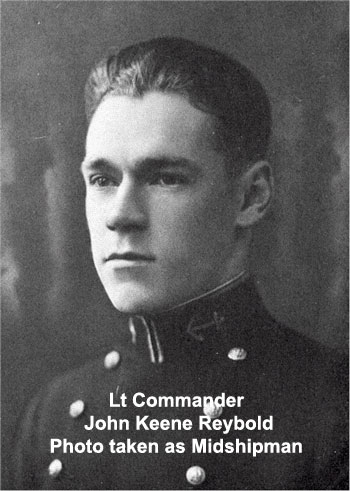
the Dickerson's Commander, Lieutenant Commander J. K. Reybold. The
Lt Commander died of his wounds 11 hours later, just before the Dickerson
docked at the Norfolk Navy Yard.
Unfortunately, the SS Liberator had fired upon not a submarine but the USS Dickerson,
DD-157, a US
Navy Destroyer. The first round hit the Dickerson on the starboard
side of the Bridge, passing through wing bridge railing, the Chart Room
and exploding in the Radio Shack. The second round was also a
hit. This attack killed three men immediately and wounding seven others to include
the Dickerson's Commander, Lieutenant Commander J. K. Reybold. The
Lt Commander died of his wounds 11 hours later, just before the Dickerson
docked at the Norfolk Navy Yard.
By 1015am the ship was passing the Diamond Shoals Buoy making 9.5 knots and using a zig-zag course to avoid being an easy target for U-boats. At this location the Liberator was joined by two other overtaking Northbound vessels, the freighter Chester Sun and the tanker SS Esso Baltimore, which were both cutting across the bow of the Liberator. Just as the buoy was passed the Liberator changed course and a terrific explosion occurred. A torpedo struck the port side of the ship at the engine room destroying the engine spaces, the decks above, and killing the five men on duty in the engine room. One of those killed, Howard P. Conway Jr., was a Merchant Marine Cadet who had not yet finished his King's Point Officer's training. He had been sent to sea early due to the lack of manpower during the war and is one of 142 Merchant Marine Cadets who lost their lives serving during WWII.
 The ship slowed to a stop and Captain Albin
Johnson mustered the crew on deck, finding the five men of the engine room
watch missing. Captain Johnson ordered an abandon ship and the 31
surviving crewmen fled in two lifeboats. They saw the ship sink
less then 25 minutes after abandoning her, about 1040am. Their rescue was not long
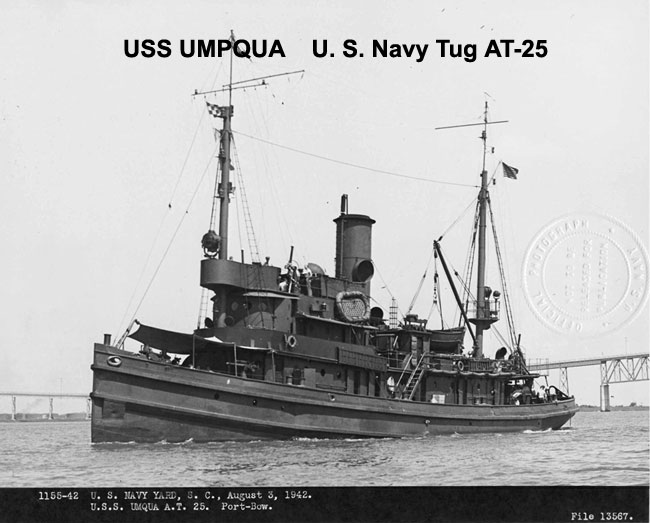
in coming as the Navy Tug USS Umpqua came along at 1125am and took them all aboard, delivering them to Morehead City, NC the next day.
The ship slowed to a stop and Captain Albin
Johnson mustered the crew on deck, finding the five men of the engine room
watch missing. Captain Johnson ordered an abandon ship and the 31
surviving crewmen fled in two lifeboats. They saw the ship sink
less then 25 minutes after abandoning her, about 1040am. Their rescue was not long
in coming as the Navy Tug USS Umpqua came along at 1125am and took them all aboard, delivering them to Morehead City, NC the next day.
The German U-boat U-332 (Liebe) had fired a single torpedo, which struck the port side aft. The U-boat Commander, Kapitanleutnant Johannes Liebe, was also responsible for sinking the Tanker Australia three days earlier. It has been speculated the torpedo was meant for the Esso Baltimore, a much more valuable target, and the Liberator a victim of unlucky timing and bad aim. However, examination of Liebe's report of the attack shows that he made a very deliberate torpedo attack on the Liberator. Liebe knew the type, size and even the name of the vessel, his aim was true and not an error.
Later
in the war, the
U-332 was attacked by aerial bombardment from RAF Squadron 461 on
May 2, 1943, near Cape Finisterre, Spain, and sunk with the loss of all
hands.
Captain Albin Johnson went on to be the Master of another vessel, the Liberty ship SS John Penn, and had the misfortune to be shipwrecked once more. While enroute to Archangle, Russia, his ship was struck by torpedoes from Luftwafe aircraft and sunk in the Barents Sea on September 13th, 1942. He survived this assault and continued to serve in the Merchant Marine for the remainder of the war. This is not atypical of the men of the Merchant Marine as many went back to sea after narrow escapes with death. Without this dedication to service, the allies may not have been victorious.
The account of the shelling of the Dickerson and sinking of the SS Liberator was written about in great detail by an unknown U.S. Naval historian for the "Fifth Naval District War Diary". The account related by this historian was compiled from official sources and interviews from survivors just after the events occurred. It was transcribed directly from the microfilm records of the War Diary and is presented on this web site here. It is well worth reading for you to get a full understanding of the event to include the attack against the USS Dickerson. The Dickerson was rebuilt in Norfolk and put back into service. She was heavily damaged during a Japanese Kamikaze attack off Okinawa on April 2 1945 and was scuttled two days later.
Bailey S. Haynie was a crewmember aboard the SS Liberator when it was torpedoed and sunk by the U-332. He memorialized the event and loss of his five shipmates in a poem that was published in a book "Convoy and Other Poems". You can read his poem here on our web site. One of the ships mentioned in the poem is probably the Tanker Australia the other may have been Kassandra Louloudis.
|
|
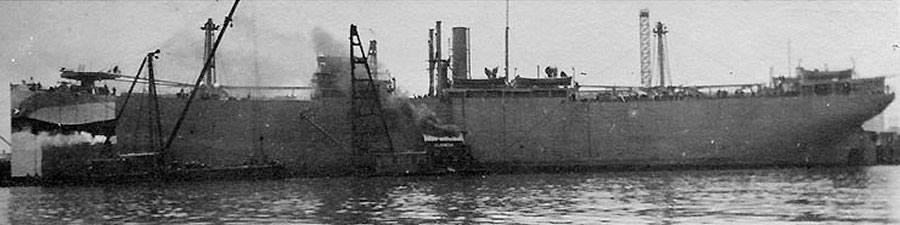
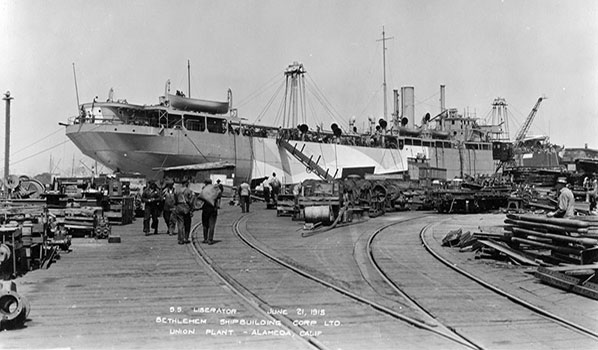 This photo of Liberator was taken at the Bethlehem Shipbuilding Corp Dock in San Fransisco, California, June 21, 1918. This photo shows the starboard side of the vessel being painted in the "Dazzle" paint scheme and was taken during the same time frame as the photo at the top of this page which shows the Port side also in the process of being painted. |
Diving the Shipwreck
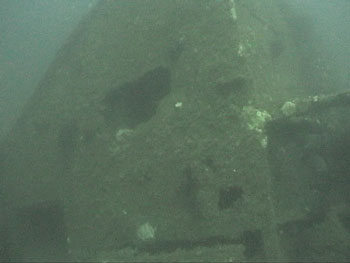
Photo is of the Liberators shelter deck at the very point of the bow. Hatches provided access to Boson's Lockers. Dive Hatteras Photo
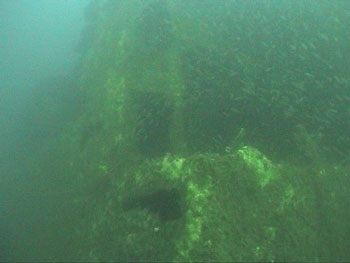
Photo is of the Amidships holds section where it rises about 30 feet from the sand. Dive Hatteras photo
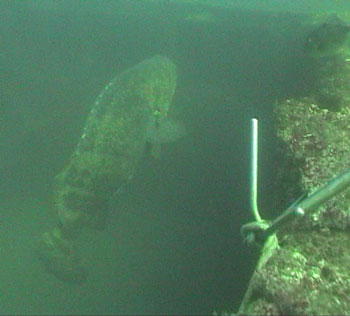
Large Goliath Groupers (Jewfish) have been seen at the Liberator many times over the past seasons. This one is about 6 to 7 feet in length. Dive Hatteras photo
 The
bow section lays about 35 feet away from the amidships section, with the
forefoot of the bow closest to the amidships piece and the stem laying at
the angle and buried into the sand. The chain lockers for the
anchors are a prominent feature of this section as the bow was torn open
at the bulkhead that created one wall of the chain lockers. The
above photo is of the shelter deck of the bow foredeck showing the access
hatches into the Boson's storage areas of the bow. The photo to the
left, showing the diver searching, was taken directly below this area and
one anchor is
visible directly above the diver. This anchor is in the Hawse pipe and the anchor chain
runs out to the winch and then to where it is still neatly stored
into chutes.
The
bow section lays about 35 feet away from the amidships section, with the
forefoot of the bow closest to the amidships piece and the stem laying at
the angle and buried into the sand. The chain lockers for the
anchors are a prominent feature of this section as the bow was torn open
at the bulkhead that created one wall of the chain lockers. The
above photo is of the shelter deck of the bow foredeck showing the access
hatches into the Boson's storage areas of the bow. The photo to the
left, showing the diver searching, was taken directly below this area and
one anchor is
visible directly above the diver. This anchor is in the Hawse pipe and the anchor chain
runs out to the winch and then to where it is still neatly stored
into chutes.
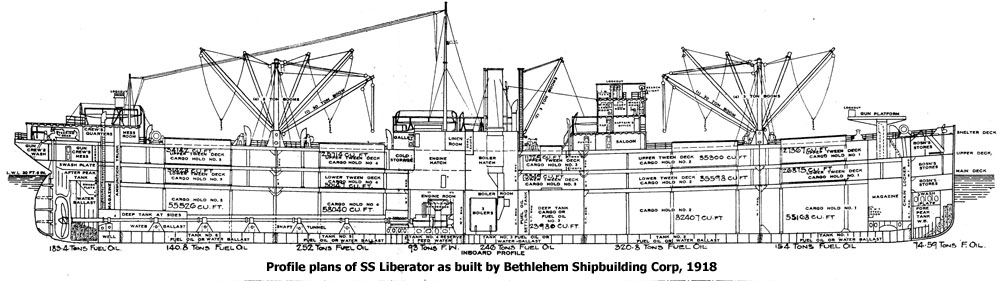
From this bow section some of the lettering of the ship's name was recovered leading to a positive identification of this wreck site. Many incorrect wreck listings have the location of the Liberator listed as the wreck site of the Venore. This site is definitively the SS Liberator and features on the wreck site match those seen on the Liberator's deck plans. The Venore has not yet been located.
The third section is not as large as the other two and also appears to be laying on it's beam but having more of a list to the point of almost being capsized. This section appears to be the forward hull section just aft of the bow, but I have not yet been able to make a safe entry into this section to determine what is contained within. The three sections are arranged into what amounts to a rough triangle with a small debris field scattered just down current behind them and this area contains lumps of the sulfur that was the Liberator's cargo. In the past I have seen various other items in this debris but in the most recent dives to this site, the debris field appears to be mostly sanded over with just large beams and plating protruding from the sand. There is no section that appears to be the actual stern of the vessel, nor any large machinery present at this site above the sand. I have seen pipes and tubing sometimes exposed at the extreme end of the largest section, so this may be where the engines spaces lay.
Though the shipwreck site is heavily damaged from the wire dragging and destructive clearance efforts after the war, these large sections are fairly intact and easily recognized as ship components and rise some 25 feet from the bottom. The SS Liberator is not dived as often as other more widely known wrecks that lay nearby and this is unfortunate as she contains wide range of sea life and no doubt some good artifacts await discovery.
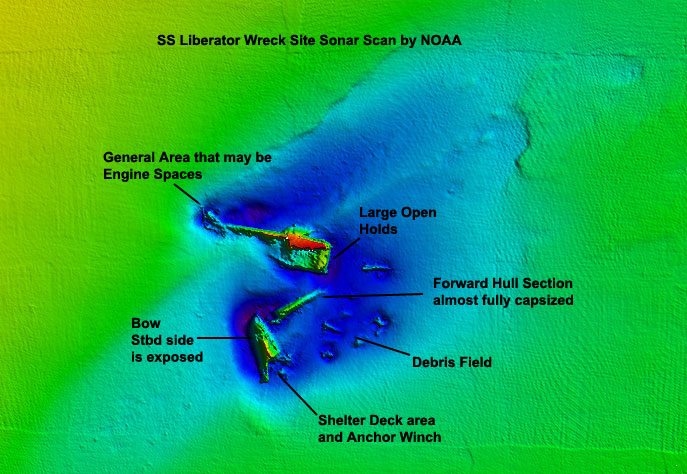
Detail of NOAA sonar scan of the Liberator site.
I have labeled the sections for clarity.
The colors represent depth from the surface,
blue deeper, red highest relief.
Some further information on the Liberator event and
photos of the USS Dickerson can be found on
Paul Hudy's BFDC/NC WreckDiving web site here.
Sources Used to develop this web page:
-
U.S. Navy Fifth Naval District War Diary, Historical Documentation of War Activity, 1941-1945, microfilm version
-
A Careless Word, A Needless Sinking, Captain Arthur R. Moore, 1985 Edition, Lib Con #82-73552
-
Shipwrecks of North Carolina, Hatteras Inlet North, Gary Gentile, ISBN #0-9621453-7-8
-
Hitler's U-Boat War, The Hunters 1939-1942, Clay Blair, ISBN #0-394-58839-8
-
Naval History and Heritage Command - Photographs
-
Bethlehem Steel / Union Iron Works Records
-
American Merchant Marine at War, www.usmm.org
-
www.shipscribe.com Vessel Plans and information
-
NOAA website about Liberator (Sonar Scan)
-
Personal dive experience of Captain Dave Sommers, Dive Hatteras